Docker With GPU
March 18, 2025 · 2 min read · Page View:
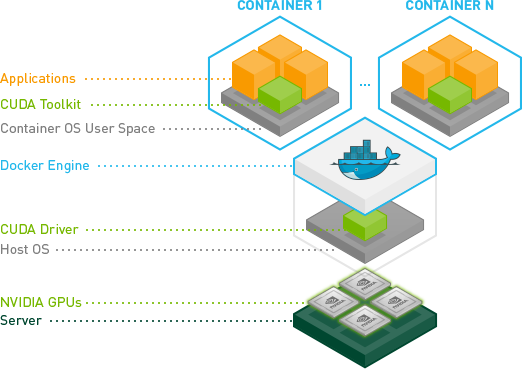
NVIDIA Container Toolkit Architecture
If you have any questions, feel free to comment below. Click the block can copy the code.
And if you think it's helpful to you, just click on the ads which can support this site. Thanks!
This post is to introduce how to use gpu in docker, which also covers the basic usage of gpu on the host machine.
Basic GPU components #
- GPU Driver
- CUDA Toolkit
The CUDA driver and kernel mode components are delivered together in the NVIDIA display driver package[1](The CUDA Toolkit is generally optional):
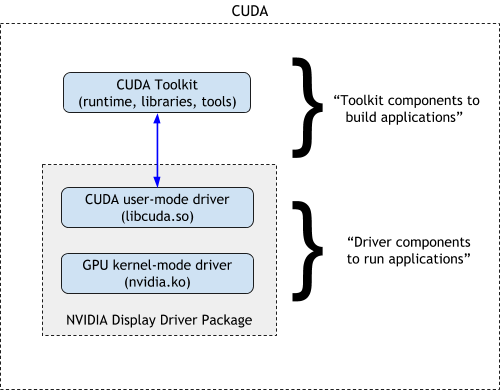 The relationship between CUDA Toolkit and GPU driver
You can checkout the device here:
lspci | grep NVIDIA
Install Driver on your device #
Download your corresponding driver from NVIDIA Driver Downloads[2]. Then run the .run file directly.
sh NVIDIA-Linux-x86_64-550.54.14.run

# check the driver
nvidia-smi
ATTENTION: the CUDA version here is only represent the max version of CUDA that the driver supports.
Install CUDA Toolkit #
Download your corresponding CUDA Toolkit from CUDA Toolkit Downloads[3]. Also select the run file.
We have installed the driver before, so we only need to install the CUDA Toolkit here.
wget xxxxxx
sudo sh cuda_xxxx.run
===========
= Summary =
===========

Driver:   Installed
Toolkit:  Installed in /usr/local/cuda-12.2/

Please make sure that
 -   PATH includes /usr/local/cuda-12.2/bin
 -   LD_LIBRARY_PATH includes /usr/local/cuda-12.2/lib64, or, add /usr/local/cuda-12.2/lib64 to /etc/ld.so.conf and run ldconfig as root

To uninstall the CUDA Toolkit, run cuda-uninstaller in /usr/local/cuda-12.2/bin
To uninstall the NVIDIA Driver, run nvidia-uninstall
Logfile is /var/log/cuda-installer.log
Follow the instructions:
# add the CUDA to the PATH
export PATH=/usr/local/cuda-12.2/bin:$PATH
# add the CUDA lib64 to the LD_LIBRARY_PATH
export LD_LIBRARY_PATH=/usr/local/cuda-12.2/lib64:$LD_LIBRARY_PATH

# check the CUDA version
nvcc -V
Test the CUDA environment #
We can test it by running a simple program:
# pip install torch
# python3 check_cuda_pytorch.py
import torch

def check_cuda_with_pytorch():
    """Check if the PyTorch CUDA environment is working correctly"""
    try:
        print("Checking PyTorch CUDA environment:")
        if torch.cuda.is_available():
            print(f"CUDA device is available, the current CUDA version is: {torch.version.cuda}")
            print(f"PyTorch version is: {torch.__version__}")
            print(f"Detected {torch.cuda.device_count()} CUDA devices.")
            for i in range(torch.cuda.device_count()):
                print(f"Device {i}: {torch.cuda.get_device_name(i)}")
                print(f"Device {i} total memory: {torch.cuda.get_device_properties(i).total_memory / (1024 ** 3):.2f} GB")
                print(f"Device {i} current memory usage: {torch.cuda.memory_allocated(i) / (1024 ** 3):.2f} GB")
                print(f"Device {i} max memory usage: {torch.cuda.memory_reserved(i) / (1024 ** 3):.2f} GB")
        else:
            print("CUDA device is not available.")
    except Exception as e:
        print(f"Error when checking PyTorch CUDA environment: {e}")

if __name__ == "__main__":
    check_cuda_with_pytorch()
![The call process[4]](https://cdn.jsdelivr.net/gh/timerring/scratchpad2023/2024/2025-03-18-13-56-57.png)
Docker with GPU #
Install nvidia-container-toolkit #
The main purpose of this component is to mount the GPU device to the container[5].
You can follow the newest version of the document[6] to install it.
Old version:
    "runtimes": {
        "nvidia": {
            "args": [],
            "path": "nvidia-container-runtime"
        }
    }
New version: nvidia-ctk
sudo nvidia-ctk runtime configure --runtime=docker
# Restart the docker service
sudo systemctl restart docker
Start container with –gpu parameter #
The whole call process is as follows:
![The call process of nvidia-container-toolkit[7]](https://cdn.jsdelivr.net/gh/timerring/scratchpad2023/2024/2025-03-18-14-00-12.png) The call process of
The call process of The whole process is changed from containerd –> runc to containerd –> nvidia-container-runtime –> runc.
Then nvidia-container-runtime intercepts the container spec, and adds the gpu related configuration to it, and then passes the spec to runc, which contains the gpu related information.
From above, we can see that the cuda tookit is already in the container. So we only need to use a image with cuda, and there is no need to install CUDA on the host machine.
Then we can start the container with the --gpus parameter:
gpus parameter:
all: allocate all GPUs to the containerdevice=<id>[,<id>...]: allocate specific GPU to the container(check vianvidia-smi)'all,"capabilities=compute,utility,video"': allocate all GPUs to the container, and set the corresponding capabilities to the container. To be more specific, if you want to use nvidia-smi you should set the utility capability, and video for NVDEC and so on.
docker run --rm --gpus all nvidia/cuda:12.0.1-runtime-ubuntu22.04 nvidia-smi
Reference #
References
- https://docs.nvidia.com/cuda/cuda-installation-guide-linux/ ↩︎
- https://www.nvidia.com/en-us/drivers/ ↩︎
- https://developer.nvidia.com/cuda-toolkit-archive ↩︎
- https://www.alibabacloud.com/help/en/ack/ack-managed-and-ack-dedicated/user-guide/how-to-select-the-nvidia-driver-version-of-a-node ↩︎
- https://docs.nvidia.com/datacenter/cloud-native/container-toolkit/latest/install-guide.html ↩︎
- https://docs.nvidia.com/datacenter/cloud-native/container-toolkit/latest/install-guide.html ↩︎
- https://docs.nvidia.com/datacenter/cloud-native/container-toolkit/1.12.0/arch-overview.html ↩︎
- https://docs.nvidia.com/ai-enterprise/deployment/multi-node/latest/workflows.html ↩︎
Related readings
If you want to follow my updates, or have a coffee chat with me, feel free to connect with me: